Gulf Coast Region — Bigger and Better Business Program
Welcome to Black Spend Connect
Black Spend Connect is the Gulf Coast Region's tool for the Bigger and Better Business (BBB) program. Brothers log their spending with Black-owned businesses. Directors see live, rolled-up totals for their chapter, state, and the region. The app also maintains an A-Z directory of every Black-owned business entered by members.
No training required — every screen is designed to be self-explanatory on a phone.
Video walkthrough — signing up, the dashboard, logging a purchase, the roster, sponsors, leaderboard, settings, and claiming a business.
Getting Started — Signing Up & Signing In
Creating Your Account
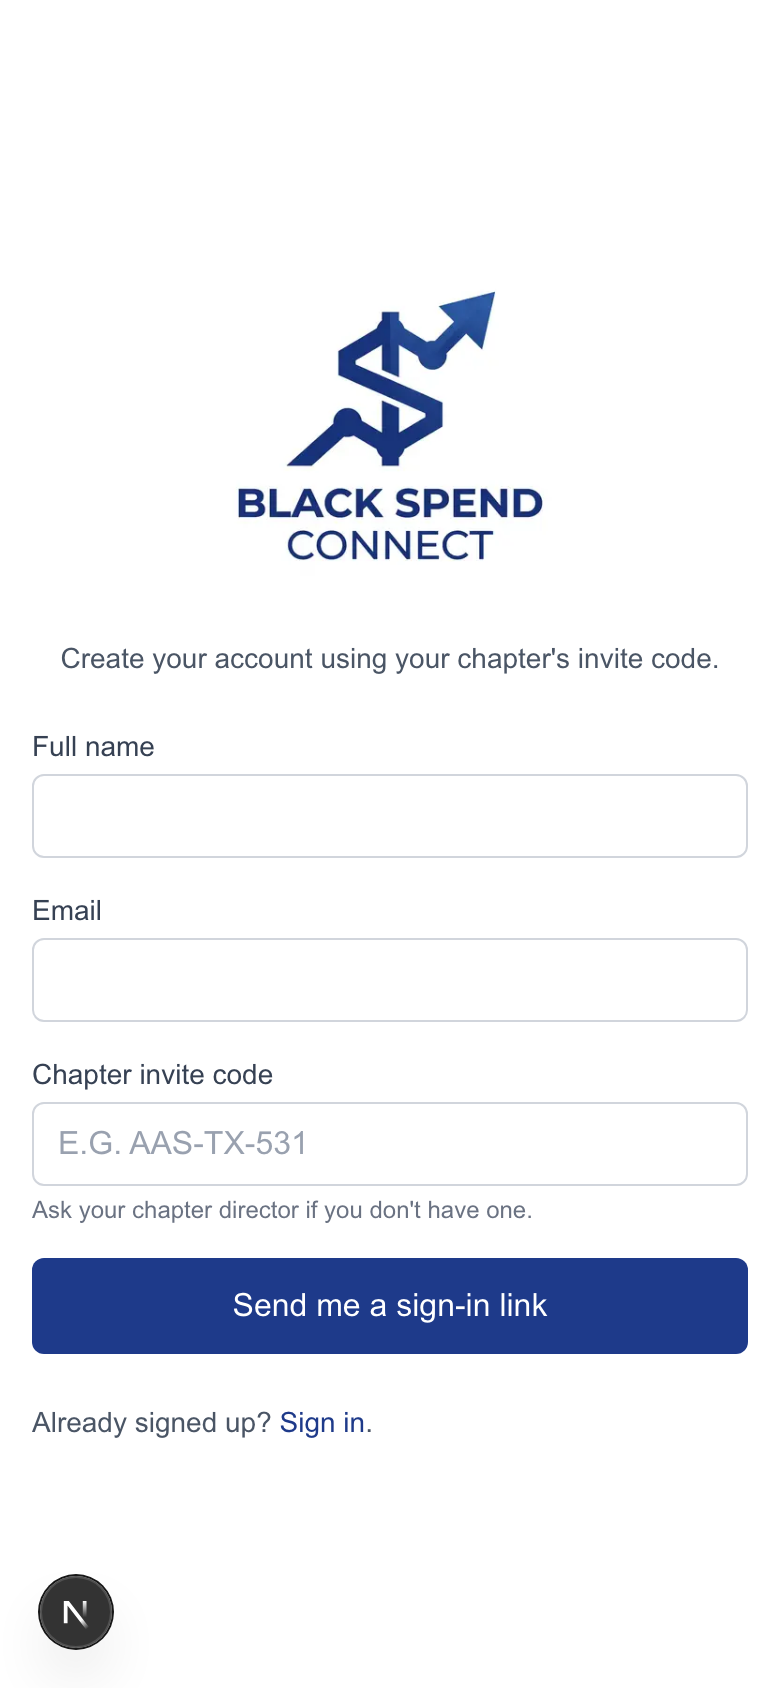
You need your chapter's invite code to sign up. Ask your Chapter Director if you don't have one. The code looks like AAS-TX-531.
Go to blackspendconnect.com and tap Create an account.
Enter your full name, email address, and chapter invite code.
Tap Send me a sign-in link.
Open the email and click the link. You're in — no password needed.
Left: creating a new account with your chapter invite code. Right: returning members sign in with a magic link.
Signing Back In
Your session stays active on your device until you sign out. If you're ever signed out, tap Sign in, enter your email, and click the magic link sent to you — no password required.
Magic links are single-use. Each link works once and expires quickly. If it says "link has expired," just request a new one.
Your Dashboard
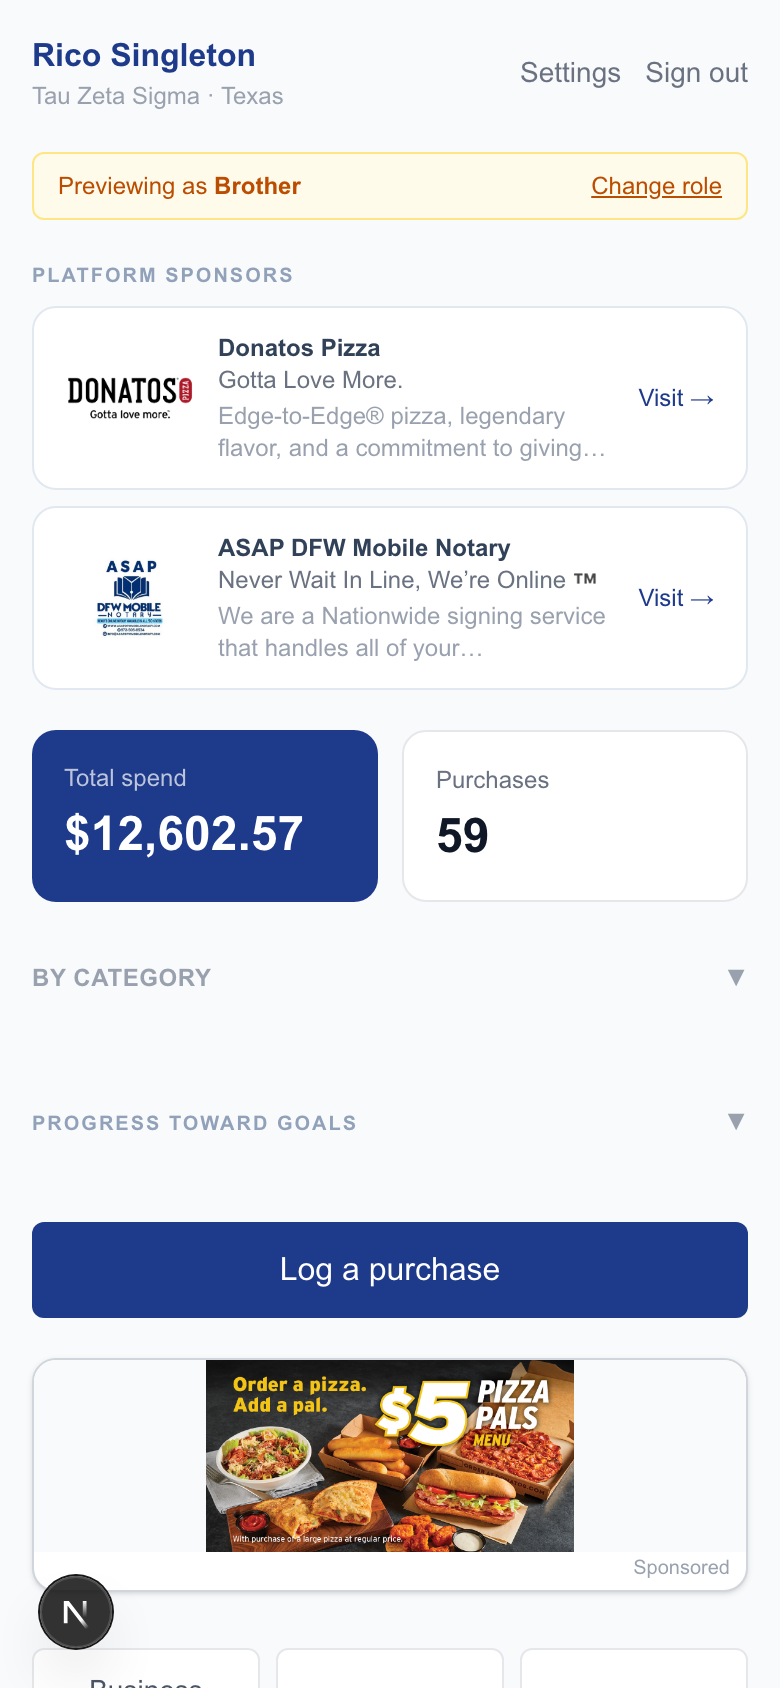
The dashboard is your home screen after signing in. It shows your personal spend stats, your chapter's progress toward its goal, platform sponsors, and quick links to every section of the app.
The member dashboard — shows platform sponsors, your personal spend total, chapter goal progress, and the Log a Purchase button.
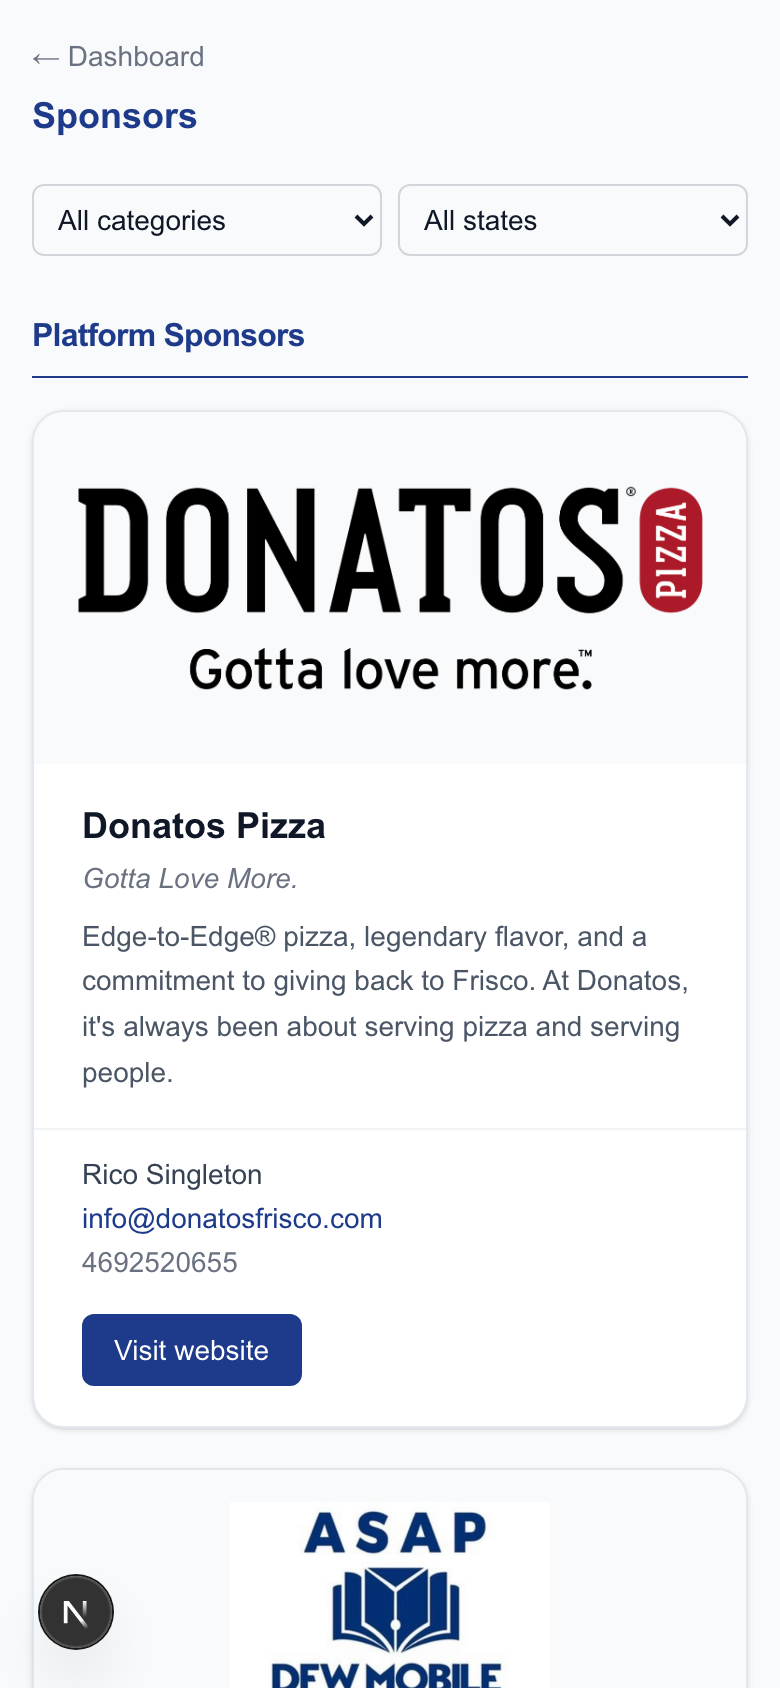
Platform Sponsors — businesses that sponsor the platform appear at the top. Tap Visit → to learn more about them.
Total spend / Purchases — your personal all-time totals in this program.
By Category — tap the arrow to expand a breakdown of your spending by business type.
Progress Toward Goals — tap to see your chapter, state, and region progress bars against their spend goals.
Log a purchase — the big blue button is the main action. Tap it whenever you make a purchase.
Bottom row: Business Roster, Sponsors, Leaderboard.
Logging a Purchase
Every time you buy from a Black-owned business, log it here. The entry takes about 30 seconds.
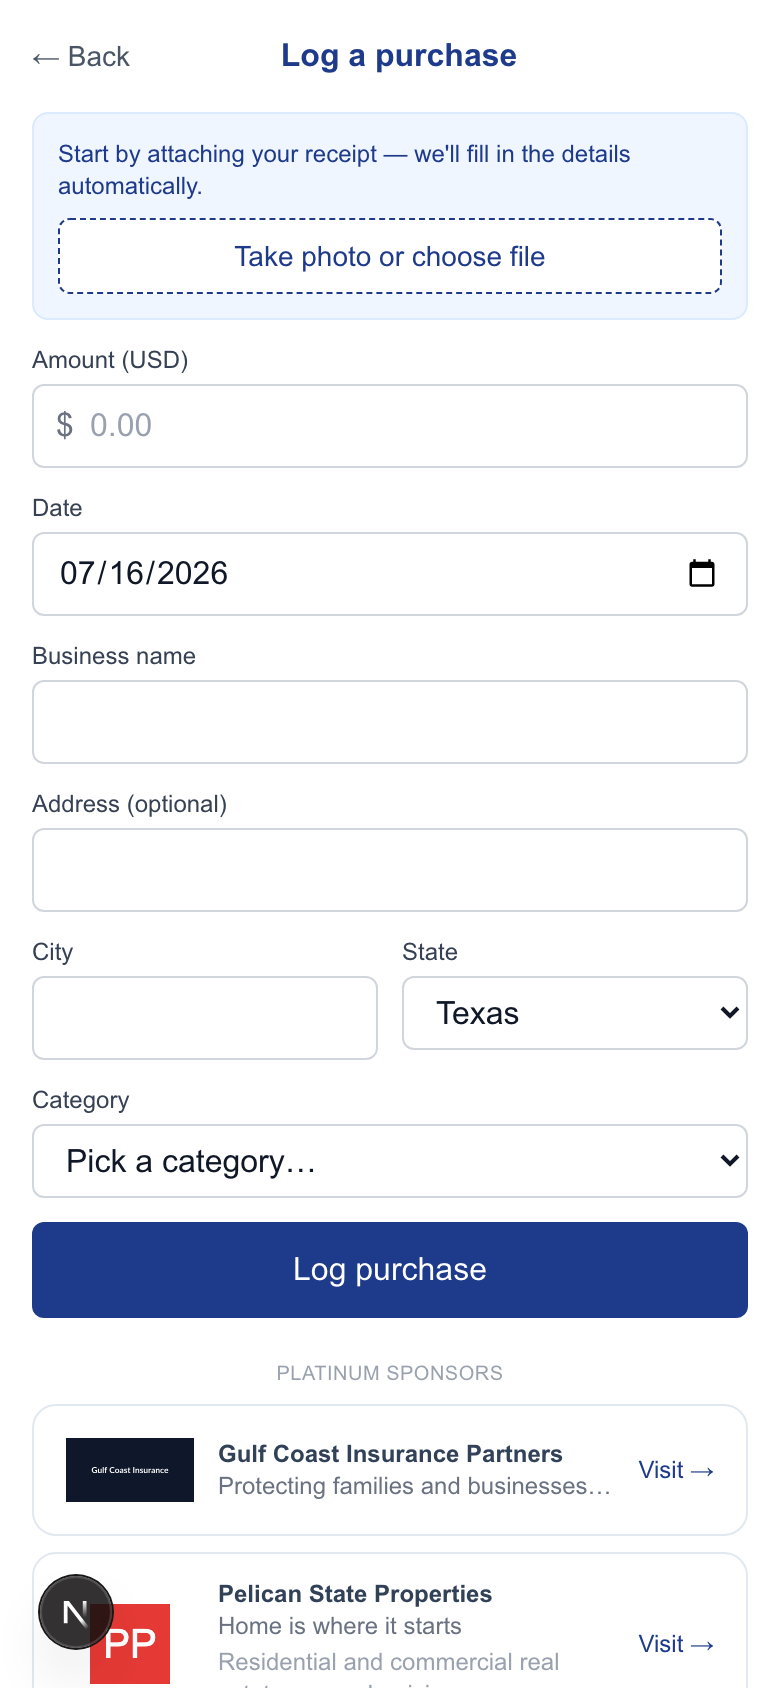
The purchase form. Start by attaching a receipt photo — the app fills in the details automatically.
Attach a receipt (optional but recommended) — tap Take photo or choose file. Accepted formats: JPEG, PNG, PDF up to 10 MB. The app pre-fills the amount from your receipt when available.
Amount (USD) — enter the dollar amount you spent.
Date — defaults to today. Change it if you're logging a past purchase.
Business name — type the name. If the business is already in the roster, it will match automatically. New businesses are added to the roster for everyone.
Address, City, State — helps identify the location. Address is optional.
Category — pick the closest match from the list.
Tap Log purchase.
No training required. The form is intentionally short — just the details that matter for the program. Don't worry about getting every field perfect.
Business Roster
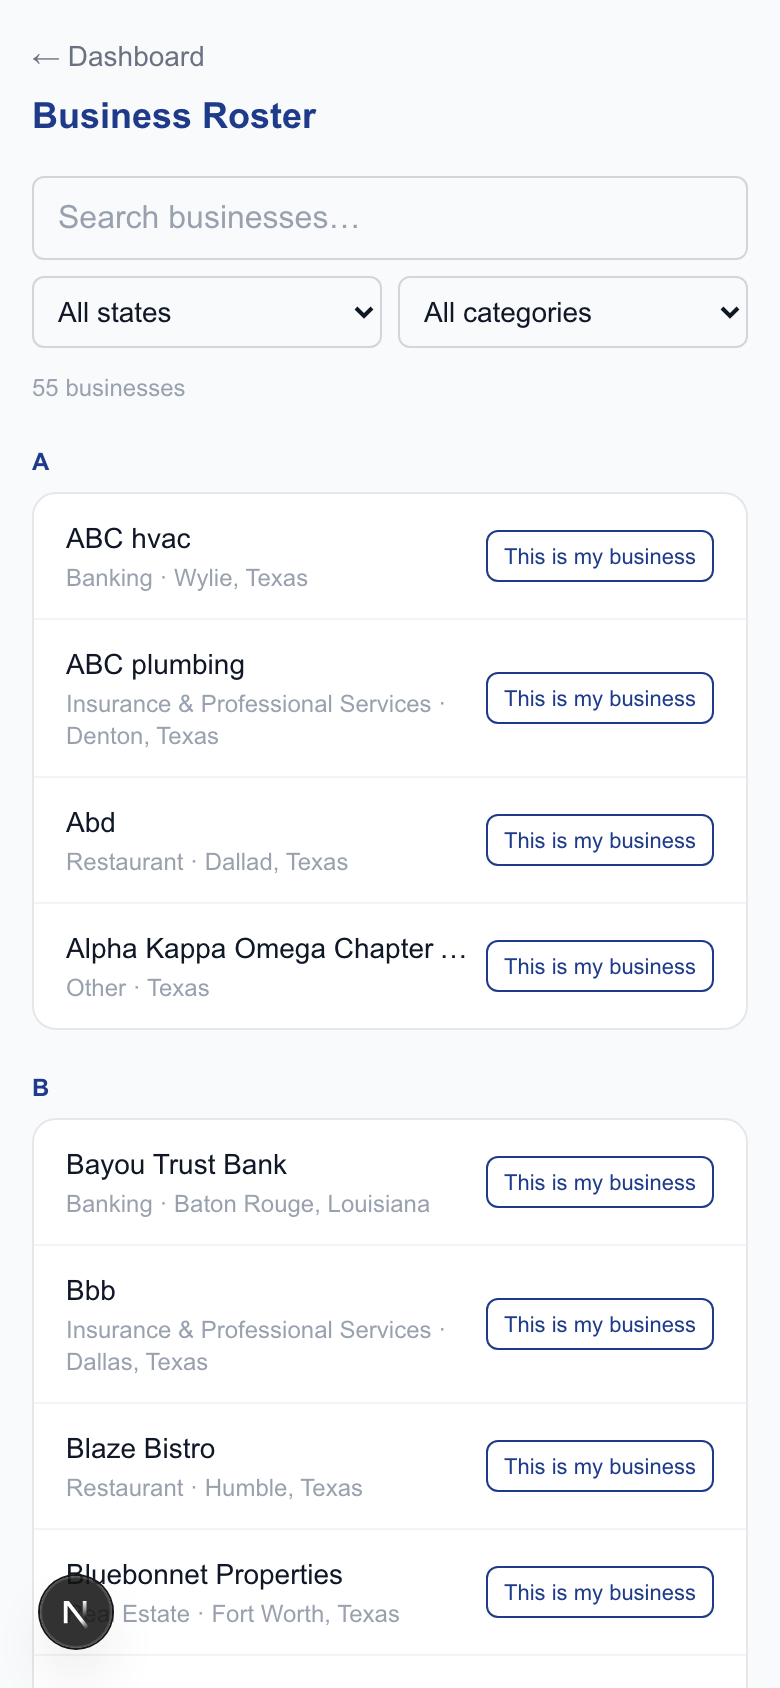
The roster is an A-Z directory of every Black-owned business that members have logged spending with. It builds itself — every new business name entered on the spend form automatically appears here.
The roster lists businesses alphabetically with category and location. Filter by state or category using the dropdowns.
Search — type any part of a business name to filter the list.
Filter by state or category — use the two dropdowns to narrow results.
This is my business — if you own one of the listed businesses, tap this button to claim it and take control of the listing.
Claiming Your Business
Business owners who are also members can claim their listing to add a description, logo, website, and contact info — and to access sponsorship and ad options.
Find your business on the Business Roster.
Tap This is my business next to your listing.
Your claim goes to the Regional Director for approval. You'll be notified when it's approved.
Once approved, a Manage My Business button replaces the claim button whenever you view the roster.
Don't see your business? Log a purchase with your business name and it will appear on the roster. Then come back and claim it.
Managing Your Business Listing
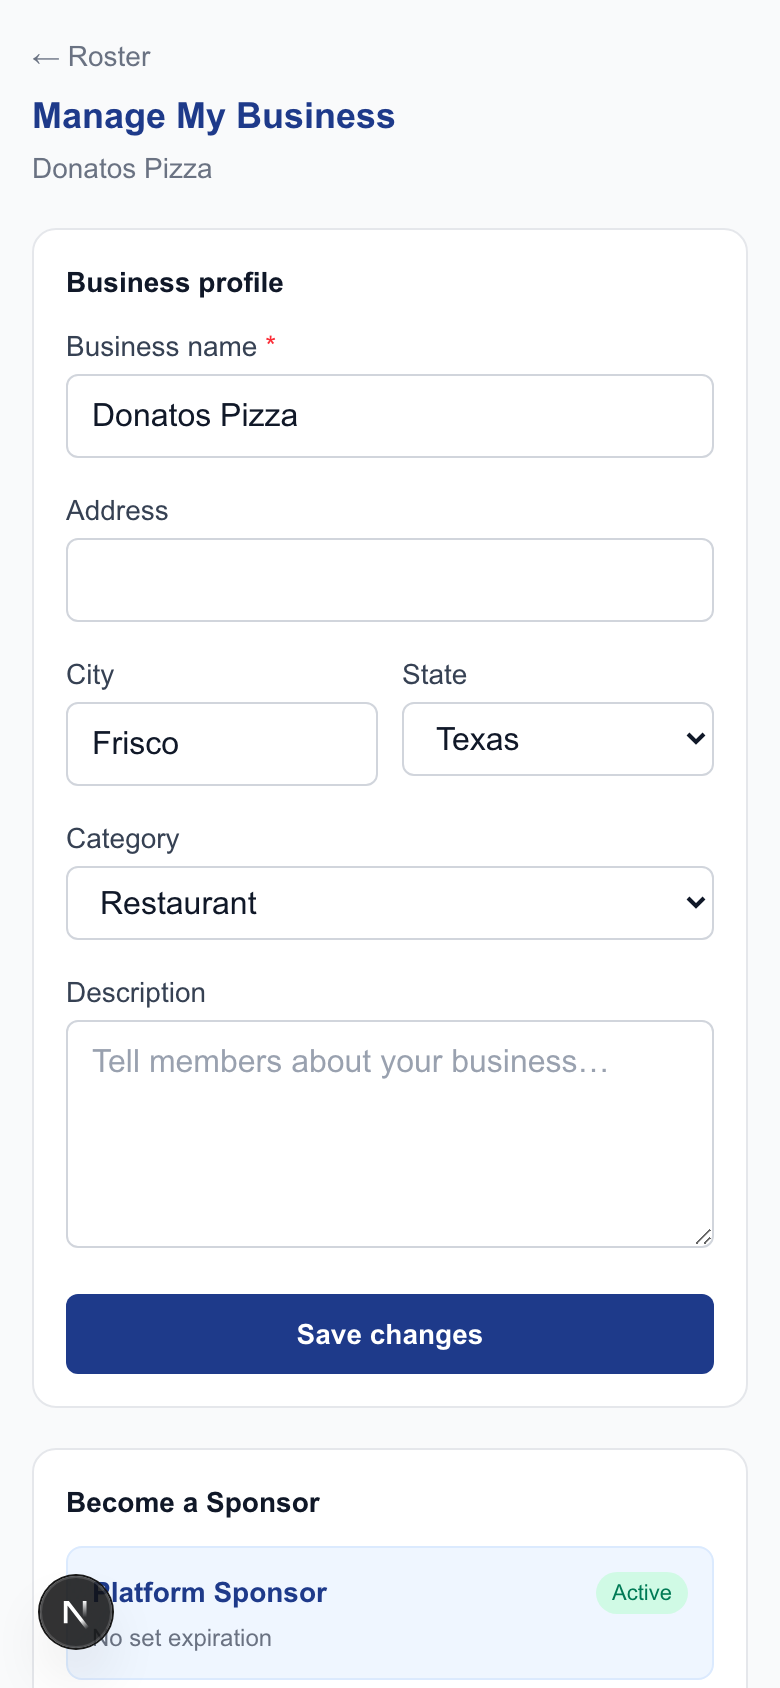
Once your claim is approved, tap your business on the roster and choose Manage My Business to edit your profile, purchase sponsorships, and create ads.
The business profile section. Keep your name, city, category, and description up to date — this is what members see.
Editing Your Profile
Business name — the name that appears everywhere in the app.
Address / City / State — helps members find you.
Category — pick the one that best describes your business.
Description — write a short pitch. This appears on your sponsor card if you're a Gold or Platinum sponsor.
Tap Save changes to update your listing immediately.
Becoming a Sponsor
Sponsoring gives your business more visibility to members across the Gulf Coast Region. Choose a tier from the Become a Sponsor section on your Manage My Business page.
The three self-service sponsorship tiers. Payment goes through Stripe — credit/debit cards accepted.
Tier
Price
Duration
What you get
Platinum
$500 (one-time)
In perpetuity
Permanent advertisement and featured profile on the Sponsors page. Rotating placement on the Log a Purchase screen every member sees. Logo on the Sponsor Recognition page. BBB initiative recognition and regional promotional opportunities.
Gold
$300
12 months
12-month advertisement and featured card with logo, description, and contact info on the Sponsors page. Logo on the Sponsor Recognition page. Regional promotional opportunities and BBB initiative recognition.
Silver
$150
6 months
6-month listing on the Sponsors page with your business name, category, city, and website link. Logo on the Sponsor Recognition page and regional promotional opportunities.
Platform
Contact RD
Arranged by RD
Top-tier placement on every member dashboard. Arranged directly with the Regional Director.
Renewing or Upgrading
Platinum sponsorships are in perpetuity — no renewal needed. For Gold and Silver, a Renew button appears on your Manage My Business page when it's time to renew. You can upgrade to a higher tier at any time — you'll be charged the new tier's price starting from the payment date.
Downgrade protection: The app will not let you purchase a lower tier than your current active sponsorship. If you see your options blocked, it means your current tier is already active — come back when it's time to renew.
Platform sponsors see their current status and a note to contact the Regional Director for renewal.
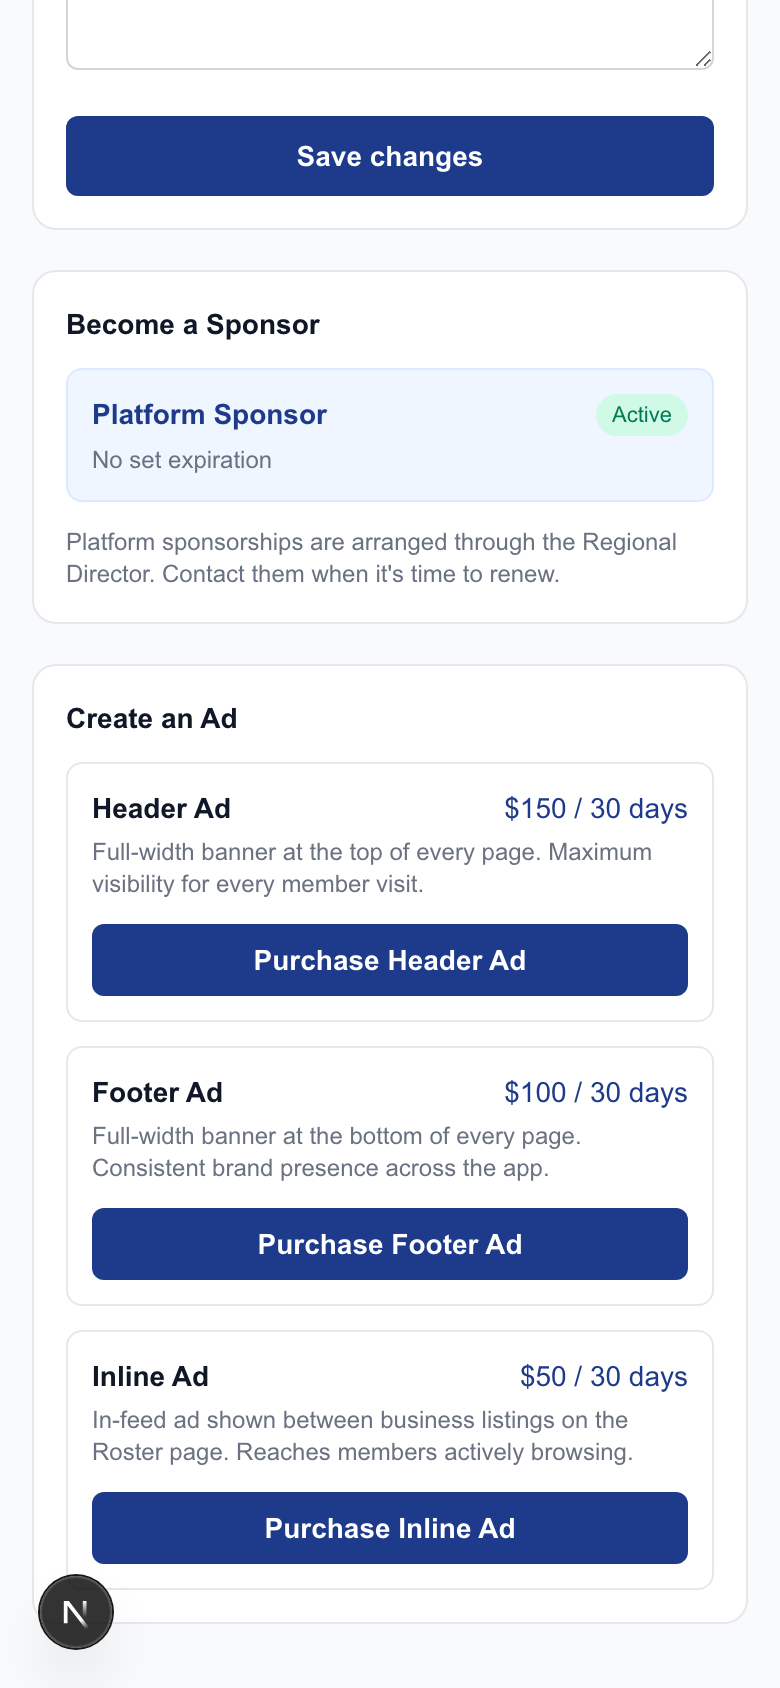
Creating an Ad
Ads are image banners that appear in the app for 30 days. You upload your creative and choose a placement. All ads must be approved by the Regional Director before going live.
Placement
Price
Where it appears
Header Ad
$150 / 30 days
Full-width banner at the top of every page — maximum visibility.
Footer Ad
$100 / 30 days
Full-width banner at the bottom of every page — consistent brand presence.
Inline Ad
$50 / 30 days
In-feed ad between business listings on the Roster page.
Purchase your chosen placement from the Create an Ad section on your Manage My Business page. You'll be taken to a secure Stripe checkout. After payment, upload your banner image and it will go live once approved.
Active ads show an Active badge and their expiration date. A Renew button appears when you want to run the ad for another 30 days.
Sponsors Page
The Sponsors page shows all active business sponsors, organized by tier. Filter by category or state to find sponsors in your area or industry.
Platform sponsors appear at the top with their full logo and description. Gold sponsors show a card with logo and contact info.
Leaderboard
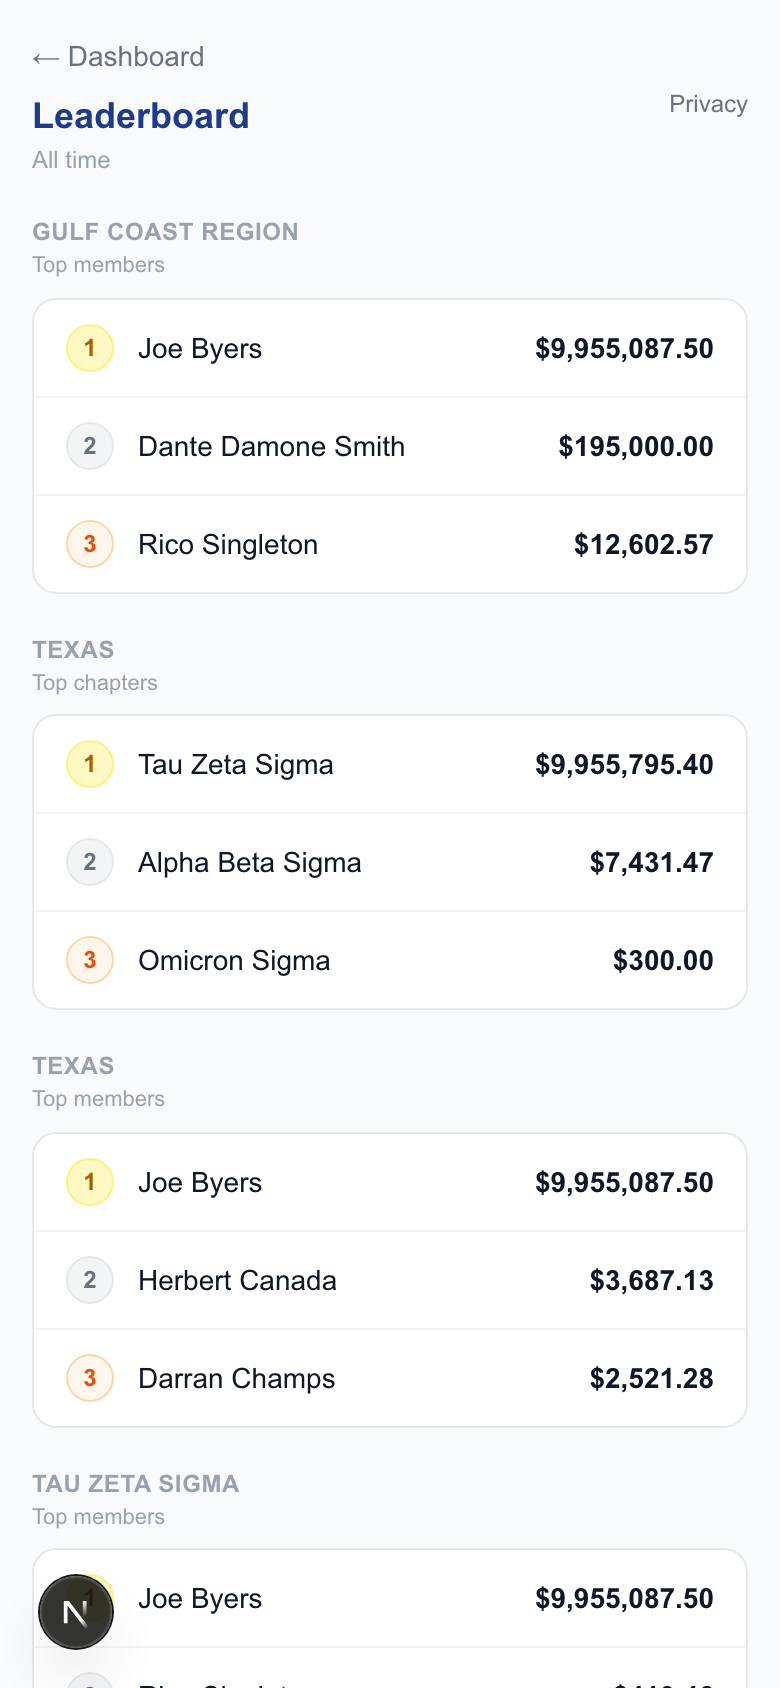
The leaderboard ranks members and chapters by total spending logged. It covers the full region and breaks down by state and chapter.
Top members and chapters — region-wide, then by state, then by chapter.
Privacy
You control whether your name appears on the leaderboard. Go to Settings → Leaderboard and toggle Visible on leaderboard off to participate privately. Your spending still counts toward chapter, state, and region totals — you just won't appear by name.
Settings & Role Preview
Tap Settings in the top-right corner of any page to access your account settings.
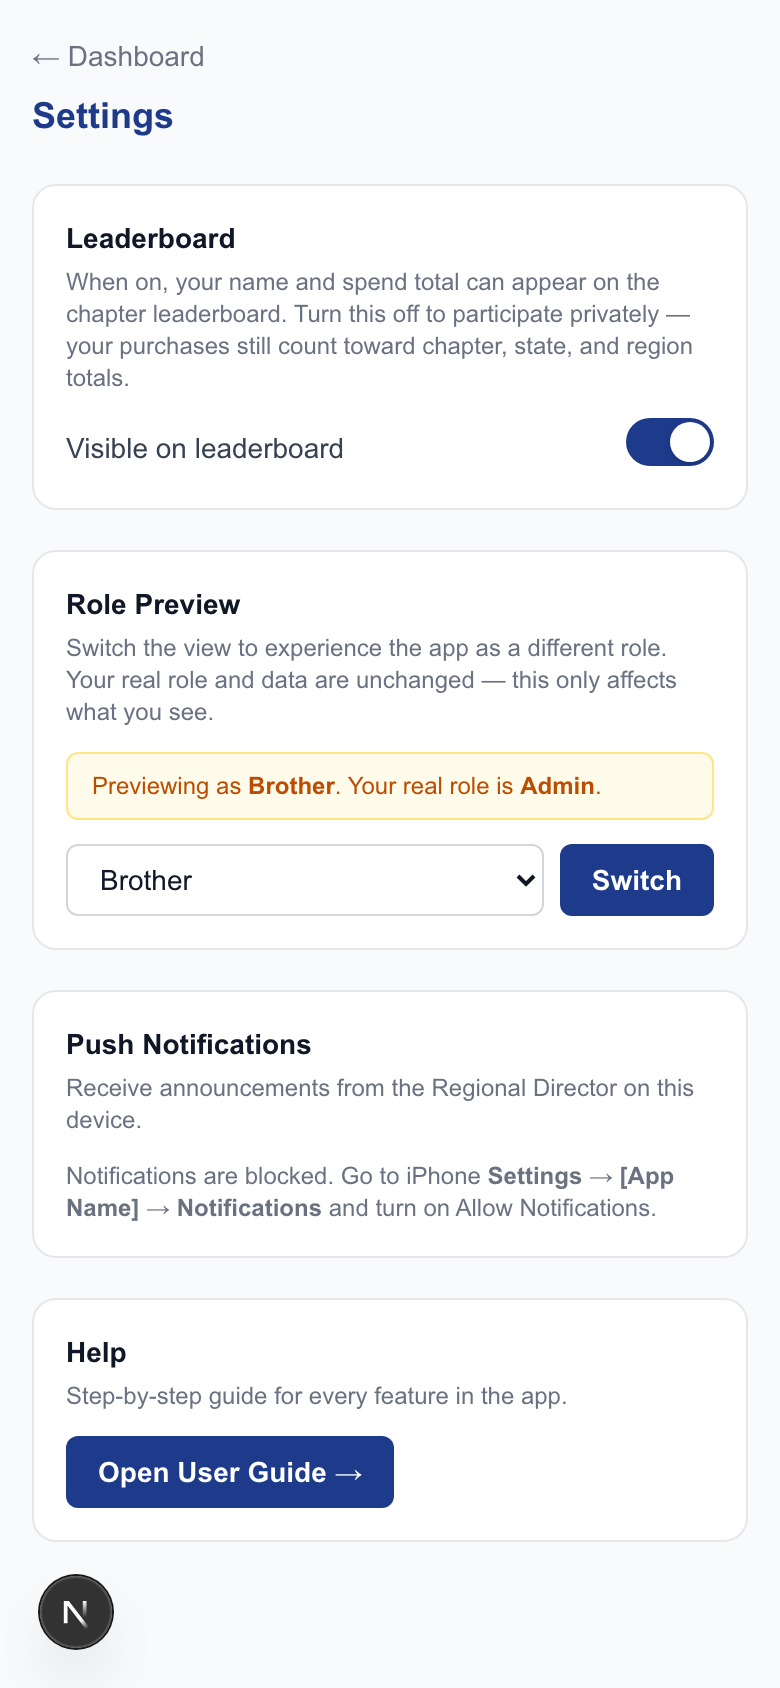
Settings shows the Leaderboard privacy toggle and — for directors and admins — the Role Preview switcher.
Leaderboard Privacy
Toggle Visible on leaderboard to control whether your name and spend total appear in the public rankings.
Role Preview (Directors & Admin only)
Directors can switch their view to see the app exactly as a Brother sees it — without needing a separate account. The Role Preview selector appears in Settings only for users with a director or admin role.
Your role
Roles you can preview
Admin
Admin, Regional Director, State Director, Chapter Director, Brother
Regional Director
Regional Director, Brother
State Director
State Director, Brother
Chapter Director
Chapter Director, Brother
Brother
(no switching needed)
When a role preview is active, a yellow banner appears at the top of every page reminding you which role you're previewing. Tap Change role in the banner or go back to Settings to switch back.
Role preview is display-only. Your real role, data, and permissions are unchanged. The yellow banner is your reminder that you're in preview mode.
For Chapter Directors
Chapter Directors see everything members see, plus a chapter-level dashboard showing total spend and entry counts for their chapter.
Your dashboard automatically shows your chapter's totals alongside your personal stats.
You can clean up vendor names and categories for businesses logged by your chapter's members.
Use Role Preview → Brother in Settings to see exactly what your members see.
Share your chapter's invite code with new members — they need it to sign up.
Video walkthrough — the chapter dashboard and vendor roster management (verify, edit, merge).
For State Directors
State Directors see rolled-up totals for every chapter in their state.
Your dashboard shows all chapters in your state with individual totals and a state-level progress bar.
Tap any chapter to drill into its spend breakdown.
Use Role Preview → Brother in Settings to see the member view.
Video walkthrough — the state dashboard, drilling into a chapter, and vendor roster management.
For Regional Directors
The Regional Director has full visibility into every chapter across Texas, Louisiana, and New Mexico.
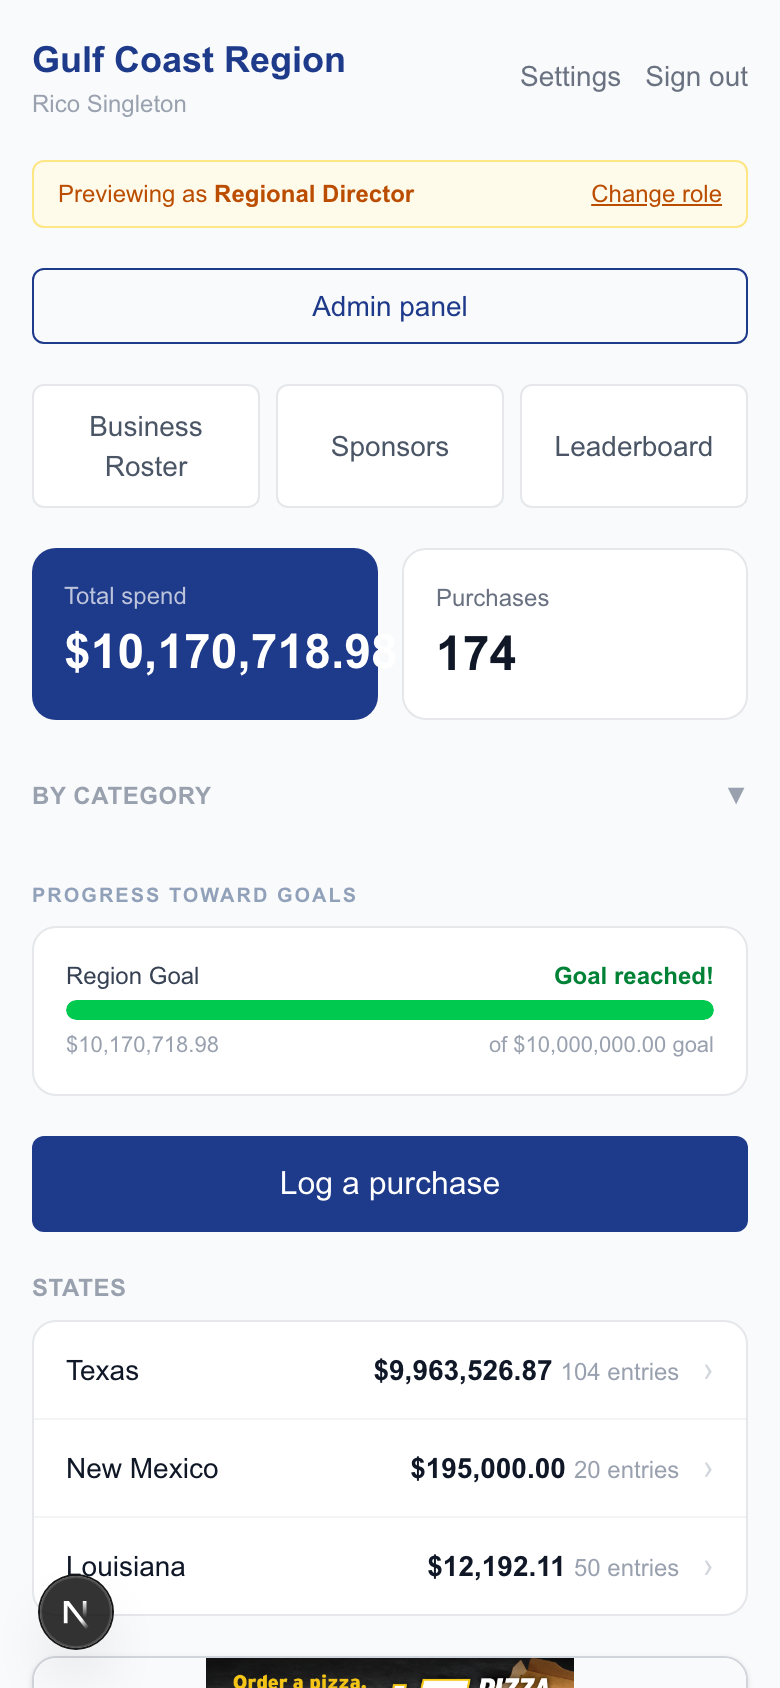
The Regional Director dashboard shows the region total, per-state drill-down, goal progress, and quick access to the Admin panel.
Region Dashboard
Total spend & purchase count — live region-wide totals.
By Category — expand to see the breakdown by business type across the entire region.
Progress Toward Goals — the region goal bar tracks against the configured target.
States — tap any state to drill into its chapter-level breakdown.
Counter & Goals
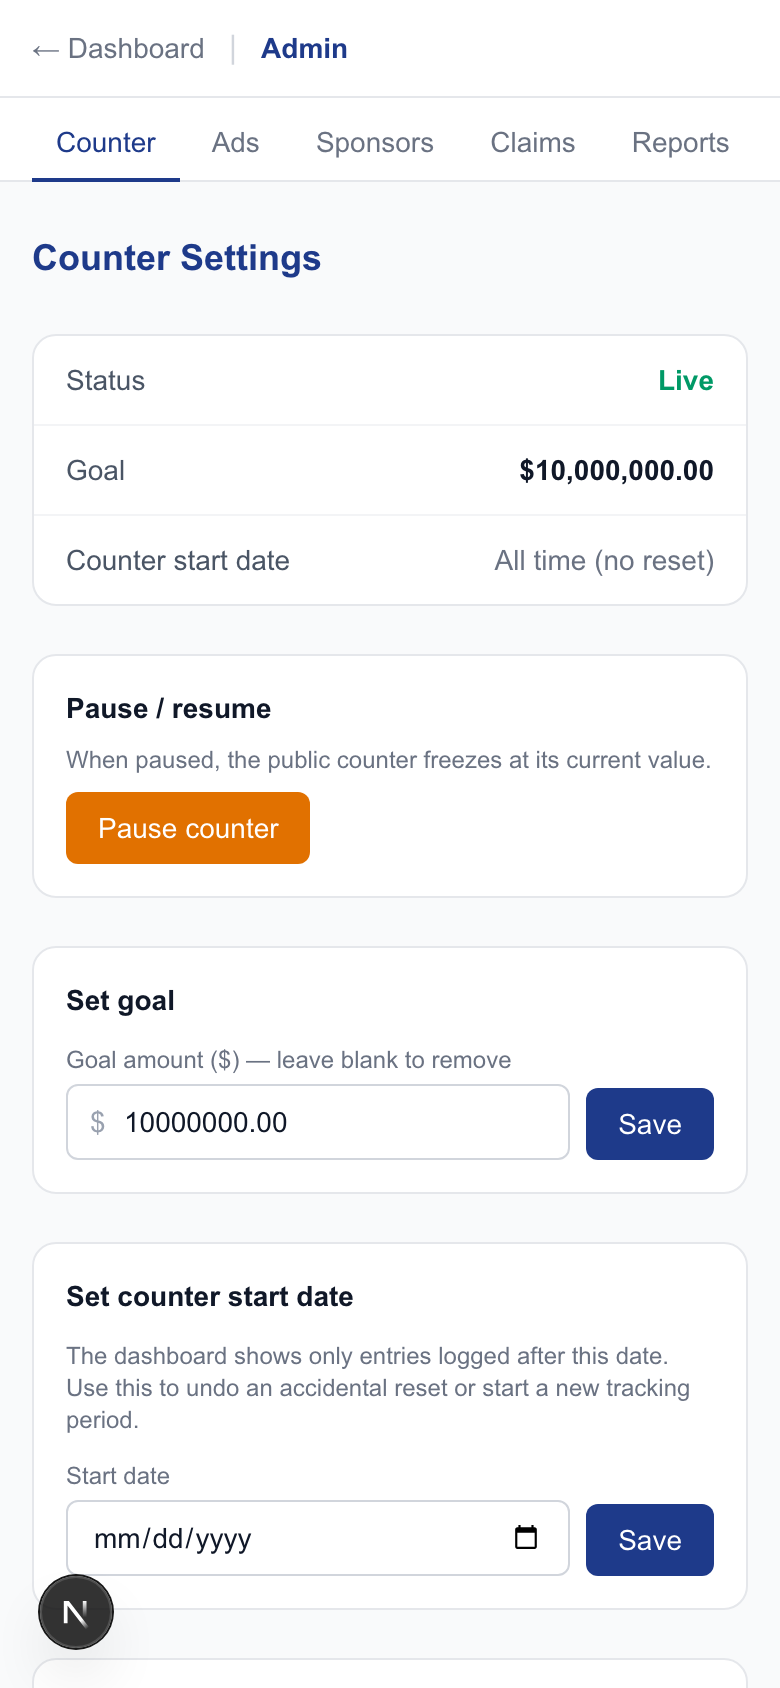
Counter settings — pause/resume, set goal, set counter start date, and reset.
Go to Admin panel → Counter to manage the region-wide counter:
Pause / Resume — freeze or unfreeze the public counter display.
Set Goal — set the region-wide spend goal that drives the progress bar on every dashboard.
Set Counter Start Date — pick a specific date (e.g., January 1 for a new year) so dashboards only show entries logged after that date. Use this instead of a full reset when starting a new tracking period.
Clear Start Date — remove the start date to show all-time totals again.
Reset Counter — sets the start date to right now. Entries are never deleted — only the displayed totals are affected.
The counter settings page shows who last changed the settings and when.
Managing Ads
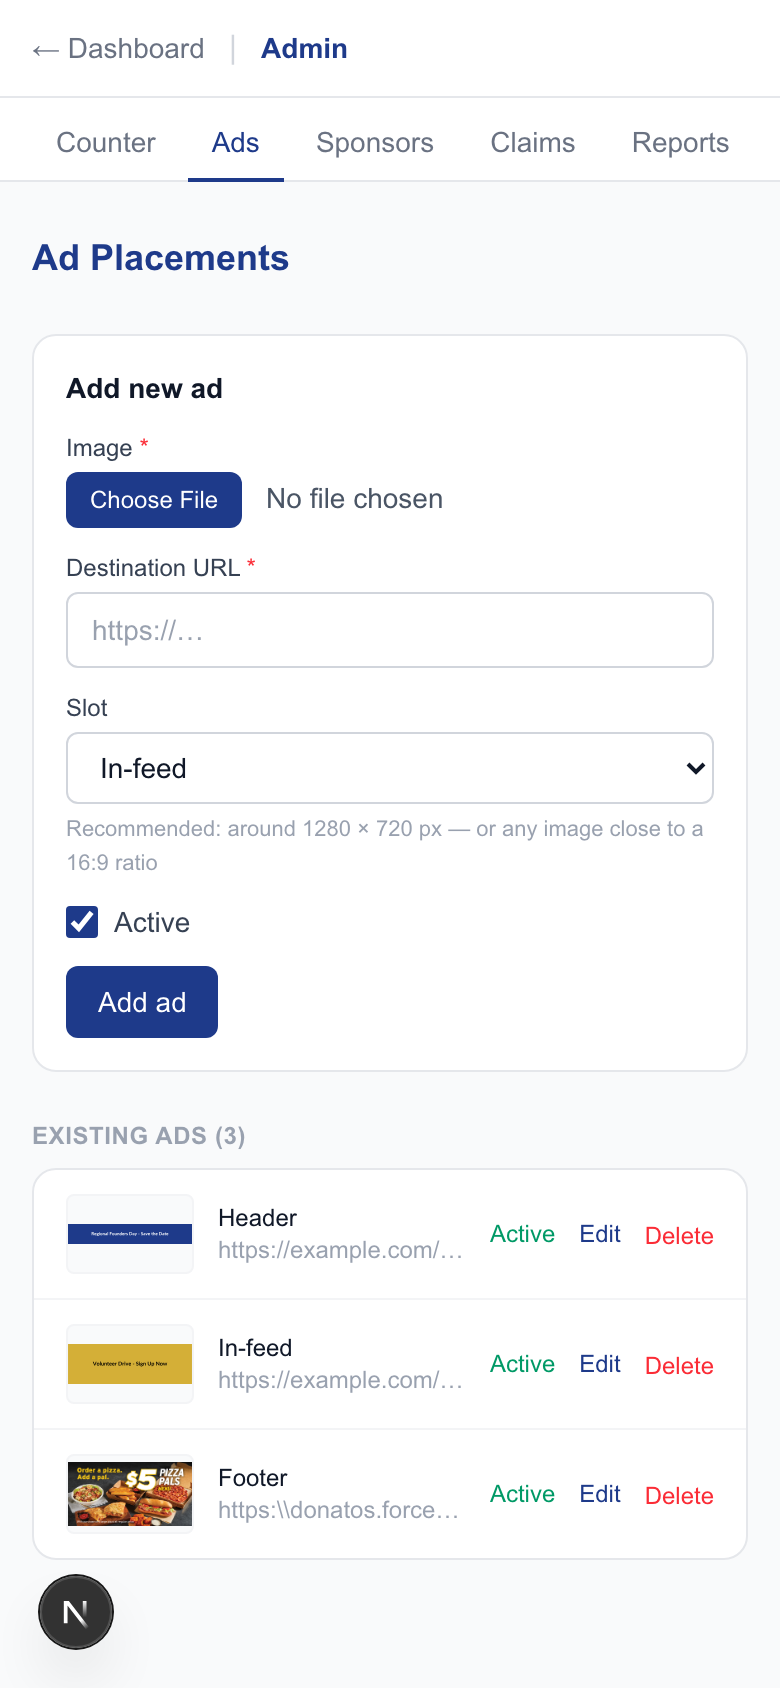
The RD ad management screen — add, edit, delete, and toggle individual ads.
Go to Admin panel → Ads to add, remove, or toggle individual ads. Upload an image, set a destination URL, assign a slot (Header, Footer, or Inline), and toggle each ad active or inactive.
Note: The master ad toggle (on/off for all ads), per-slot toggles, sort order, and pinning are managed by the Admin under Admin Config → Ads. Regional Directors manage the ad content; the Admin controls the placement settings.
Managing Sponsors
Go to Admin panel → Sponsors to add, edit, or deactivate sponsors at any tier (Platform, Platinum, Gold, Silver). Upload logos, enter contact info, and set expiration dates. Sponsors expiring within 30 days are flagged so renewals aren't missed.
Note: Platform Sponsor sort order, pinning, and the dashboard count setting are managed by the Admin under Admin Config → Sponsors.
Business Claim Approvals
When a member submits "This is my business," you'll need to approve or deny the claim. Claims appear in Admin panel → Ownership Claims. Once approved, the owner gains access to their Manage My Business page where they can edit their listing, purchase sponsorships, and create ads.
For the Admin
The Admin account has access to everything the Regional Director has, plus a separate configuration dashboard at /admin-config for platform-wide settings.
Admin Config — Reports
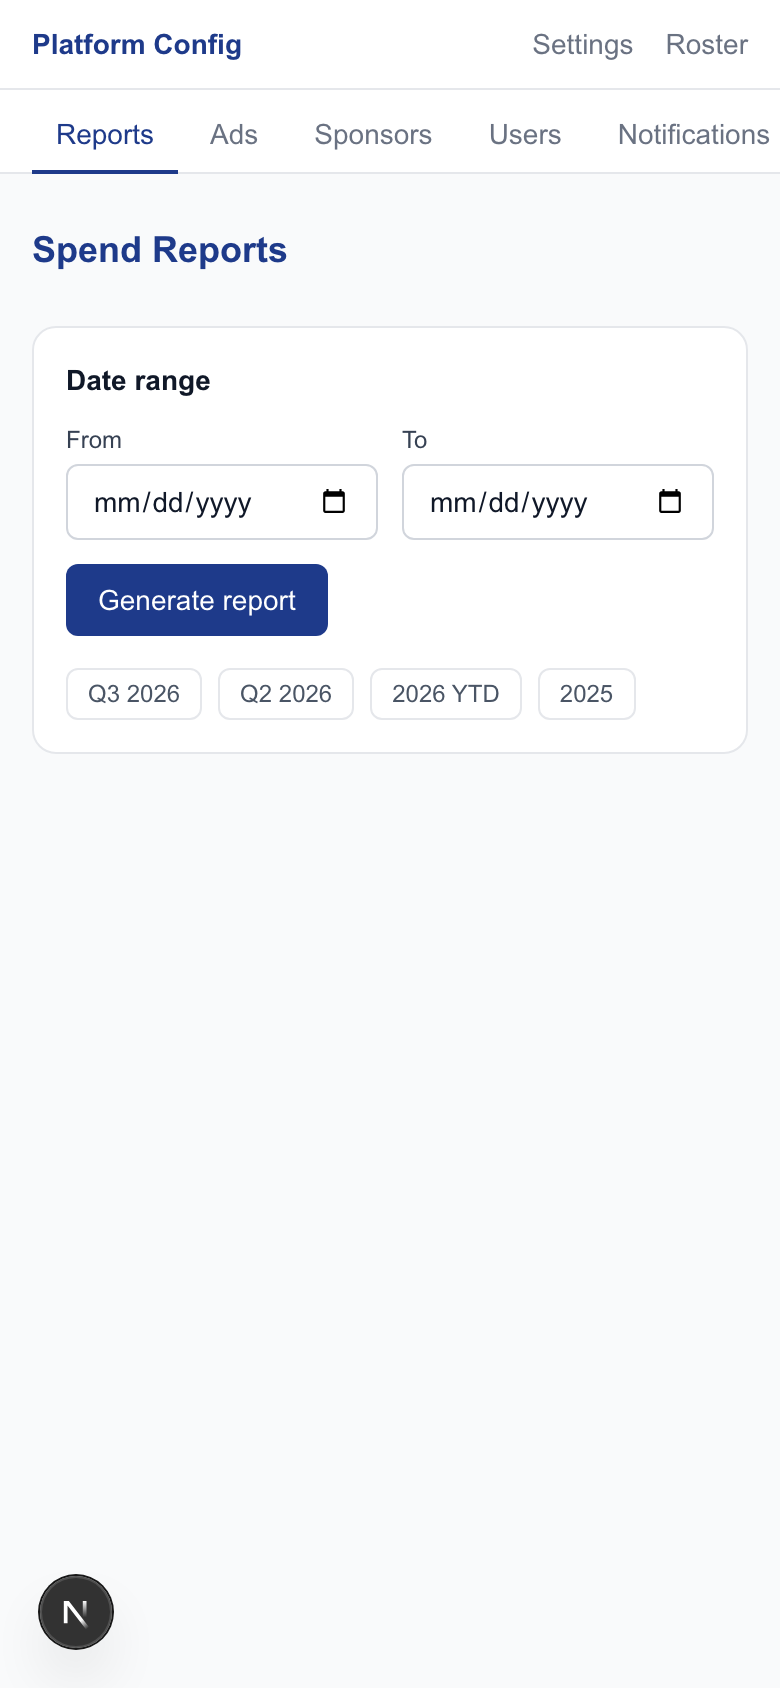
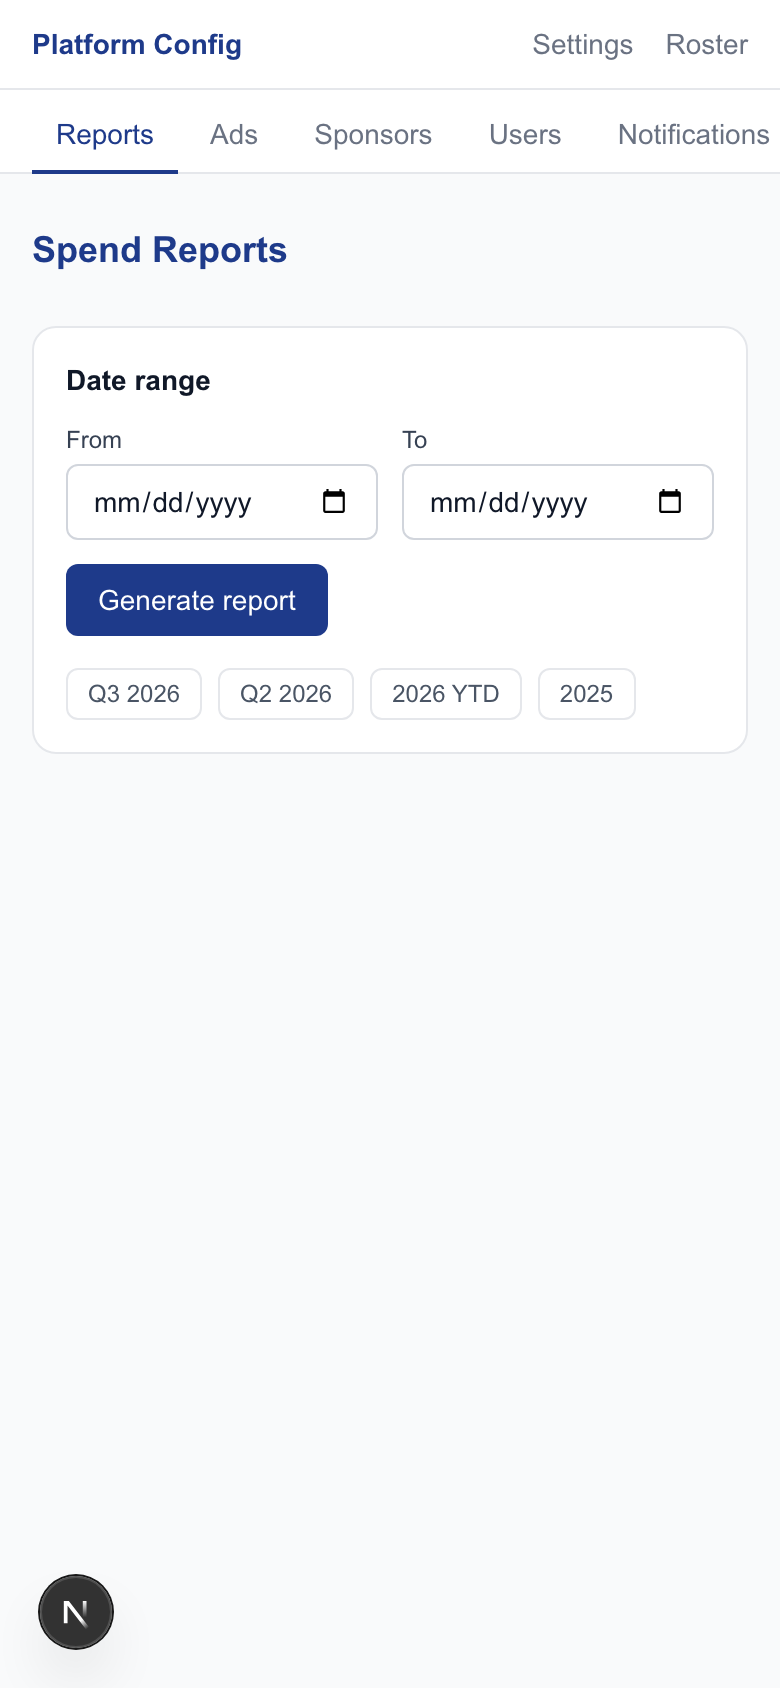
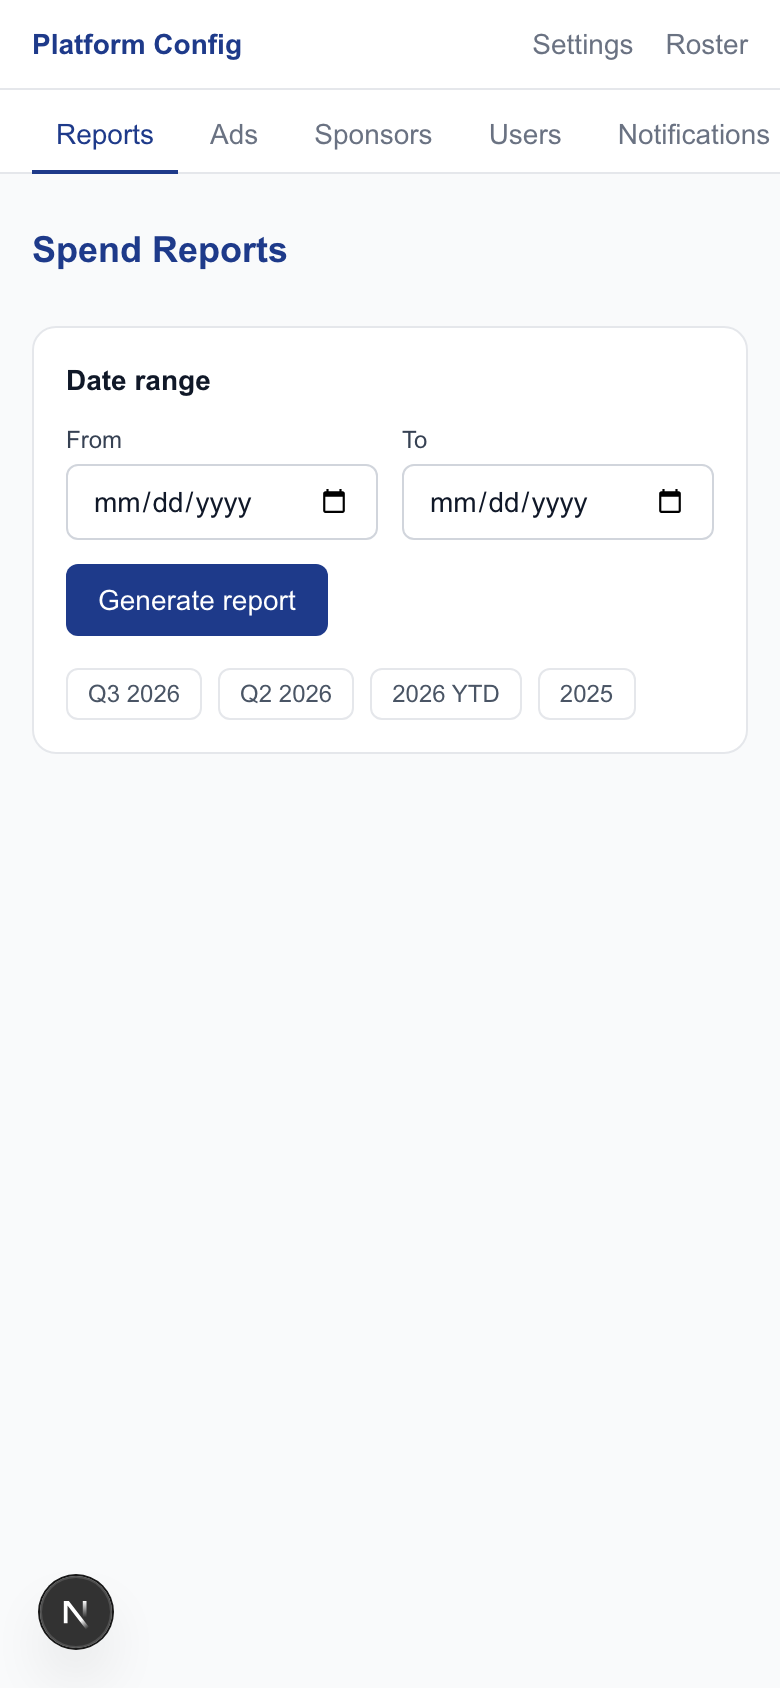
Date range spend reports let you answer questions like "what was total spend for Q1?" Quick shortcuts for current quarter, previous quarter, YTD, and prior year. Results show region total → state subtotals → chapter breakdowns, sorted by spend (highest first).
The reports page with date range picker and quick-range shortcuts.
Admin Config — Ads
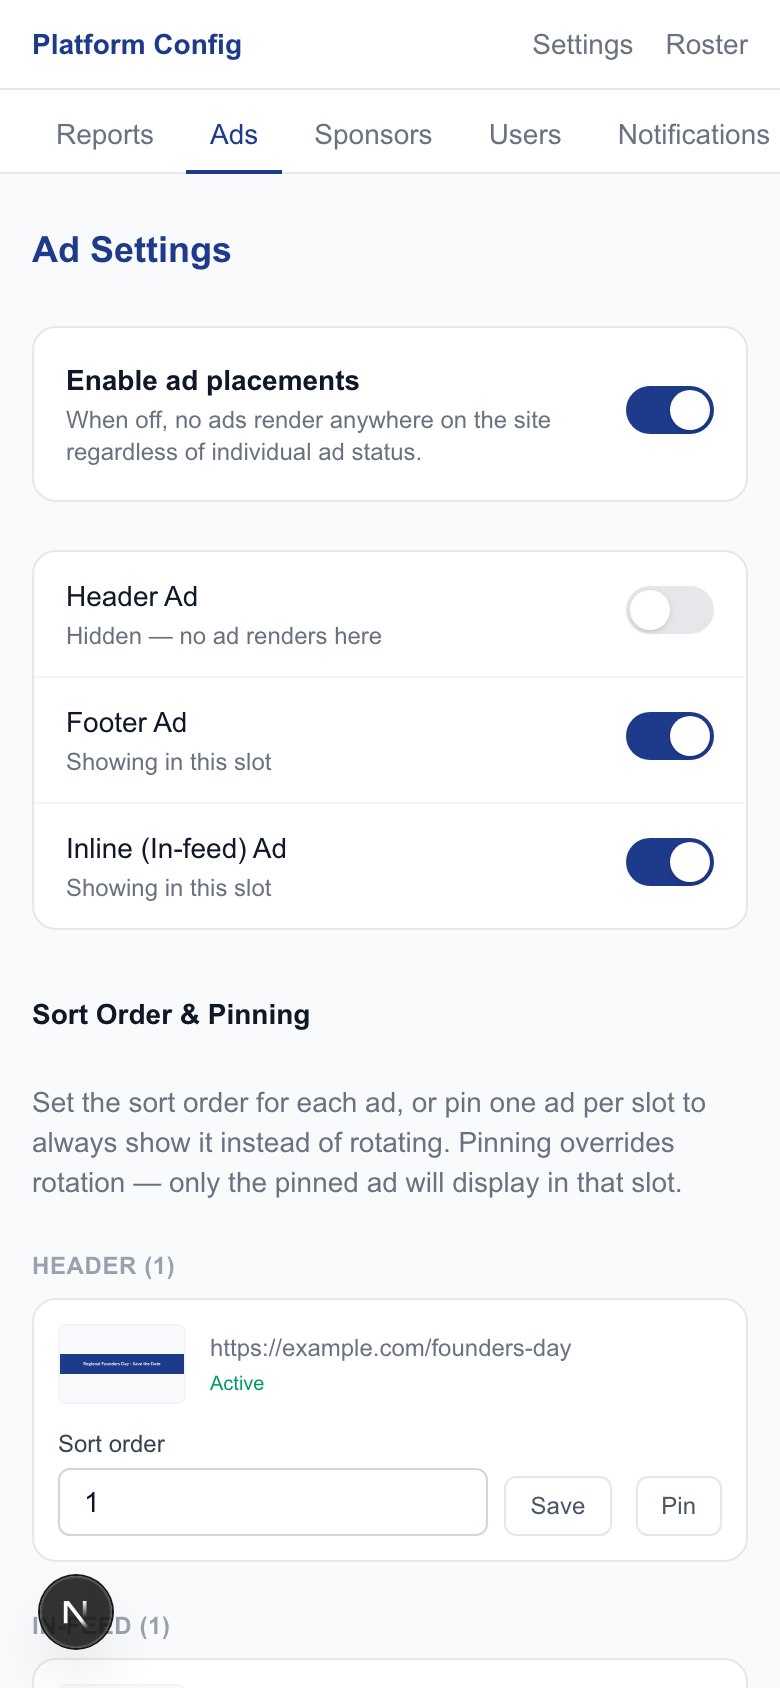
Controls ad placement settings that are separate from the ad content the Regional Director manages:
Master Toggle — enable or disable all ad rendering globally. When off, no ads appear anywhere in the app.
Per-Slot Toggles — independently enable or disable Header, Footer, and Inline ad slots. Per-slot toggles only apply when the master toggle is on.
Sort Order — set the display order for each ad within its slot (lower number = shown first).
Pin — pin one specific ad per slot to always show it instead of rotating. Pinning a new ad automatically unpins the previous one in that slot.
Ad settings — master toggle, per-slot toggles, sort order, and pinning controls.
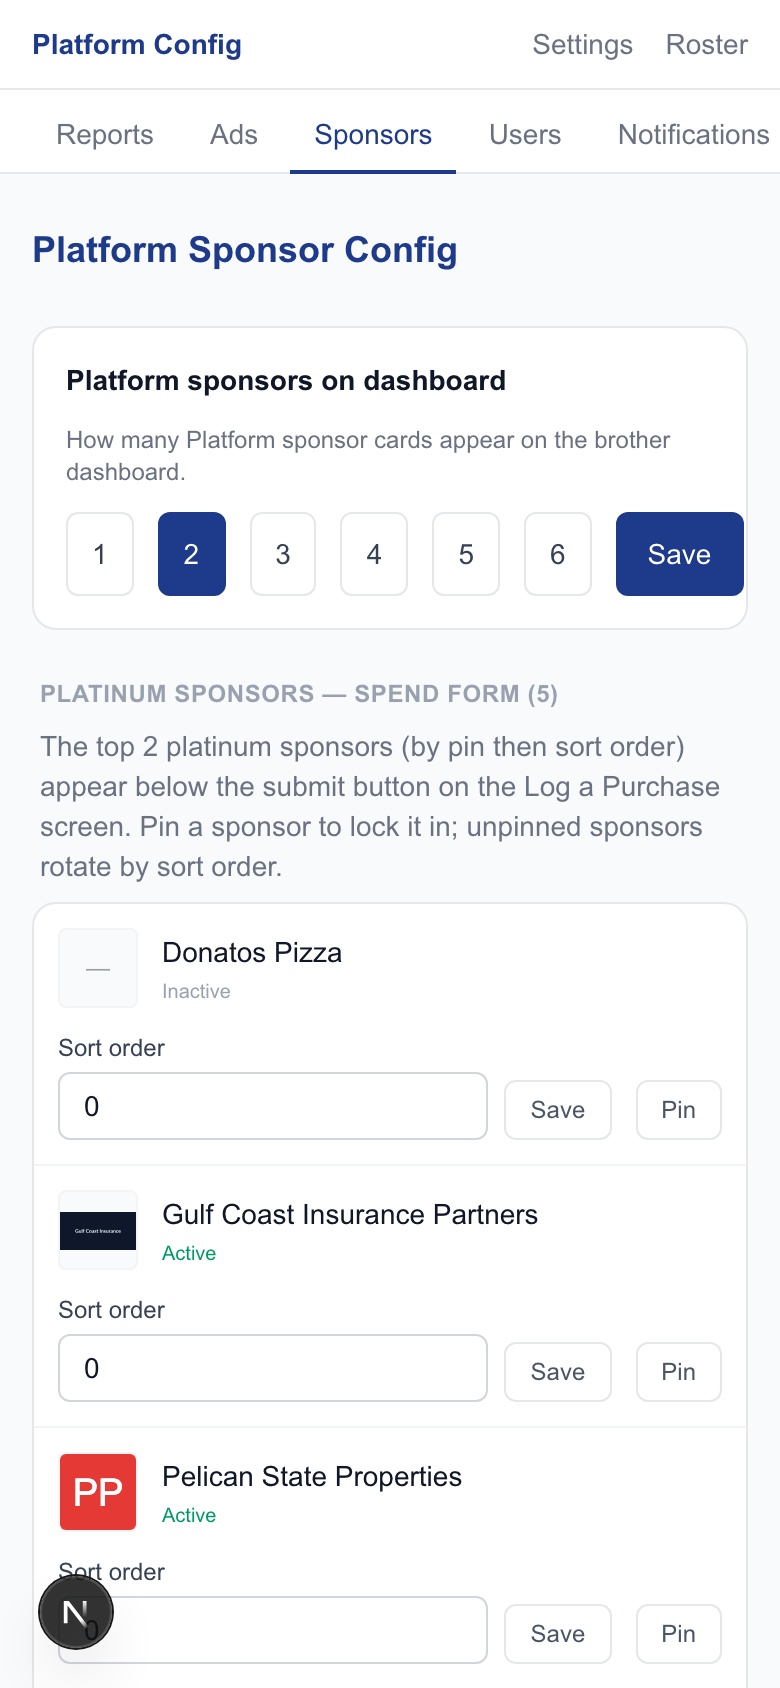
Admin Config — Sponsors
Controls Platform and Platinum sponsor placement:
Dashboard Count — set how many Platform sponsor cards appear on the brother dashboard (1–6).
Sort Order & Pinning — control display position for Platform sponsors on the dashboard and Platinum sponsors on the Log a Purchase screen.
Sponsor sort order, pinning, and dashboard count settings.
Role Preview
The Admin can preview any role in the app — Regional Director, State Director, Chapter Director, or Brother — using Settings → Role Preview. This lets you see exactly what each role sees without needing separate test accounts. The admin has full data access when previewing any role, so dashboards will show real data at whatever scope the previewed role would see.
Push Notifications
Black Spend Connect can send push notifications to your phone or desktop browser. To enable them:
Go to Settings (tap the link in the top-right corner of any page).
Under Notifications, tap Enable push notifications.
Your browser will ask for permission — tap Allow.
iPhone users: You must first add Black Spend Connect to your home screen (Safari → Share → Add to Home Screen) to receive push notifications. iOS requires the app to be installed as a PWA. If notifications show as "blocked," remove the app from your home screen, clear Safari website data for blackspendconnect.com in iPhone Settings, re-add the app, and allow notifications when prompted.
To turn off notifications, return to Settings and tap Disable push notifications.
Getting Help
Forgot your invite code? — Ask your Chapter Director.
Can't sign in? — Request a new magic link. Links expire quickly and are single-use.
Business not on the roster? — Log a purchase with that business name and it will appear automatically.
Want to claim your business? — Find it on the roster and tap This is my business. The Regional Director will approve your claim.
Technical issues? — Contact your Chapter Director or the Regional Director.